ChatGPT and Power Automate, the perfect combination | Part II
As we saw in the first part of the article, nowadays, most companies are constantly looking for ways to optimize their processes and improve their productivity.
To achieve these goals, many companies use Microsoft Power Automate, a tool that allows our company to automate repetitive tasks and simplify processes.
Therefore, in today’s article, we will explain in a practical and step-by-step way how to integrate ChatGPT in Microsoft Teams using Power Automate.
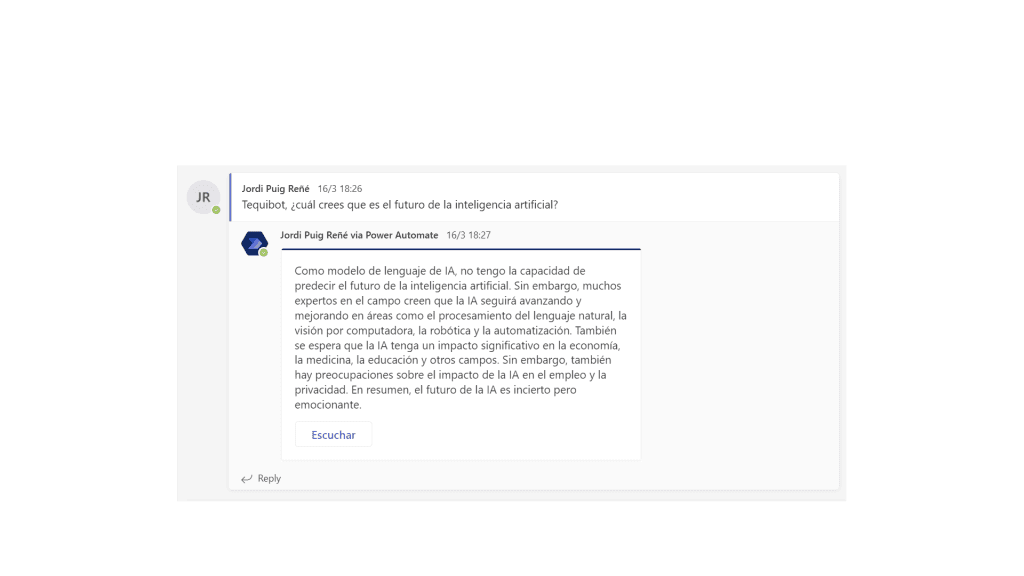
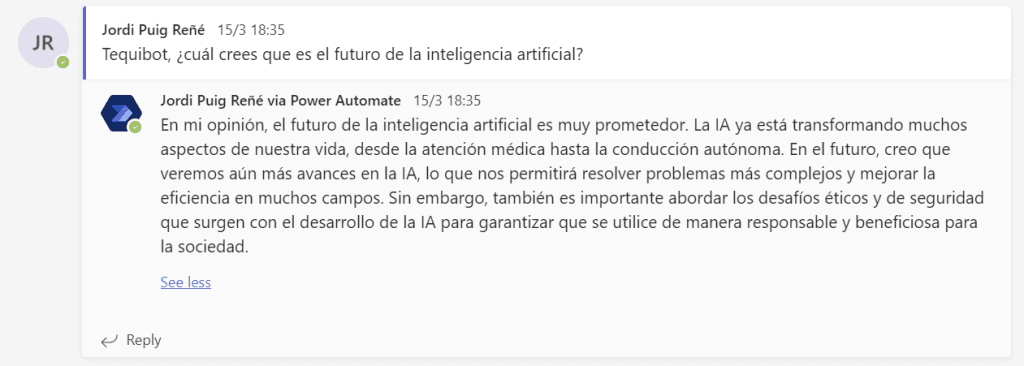
The result that we will obtain will be an assistant called Tequibot, which will be at our disposal to answer the questions we ask, integrated with a Microsoft Teams channel using the OpenAI API.
How to integrate ChatGPT in Microsoft Teams with Power Automate?
Let’s see step by step how to integrate ChatGPT into Microsoft Teams, the collaboration application created by Microsoft.
Step 1
First, we need to create an account on OpenAI and generate a “Secret Key”.
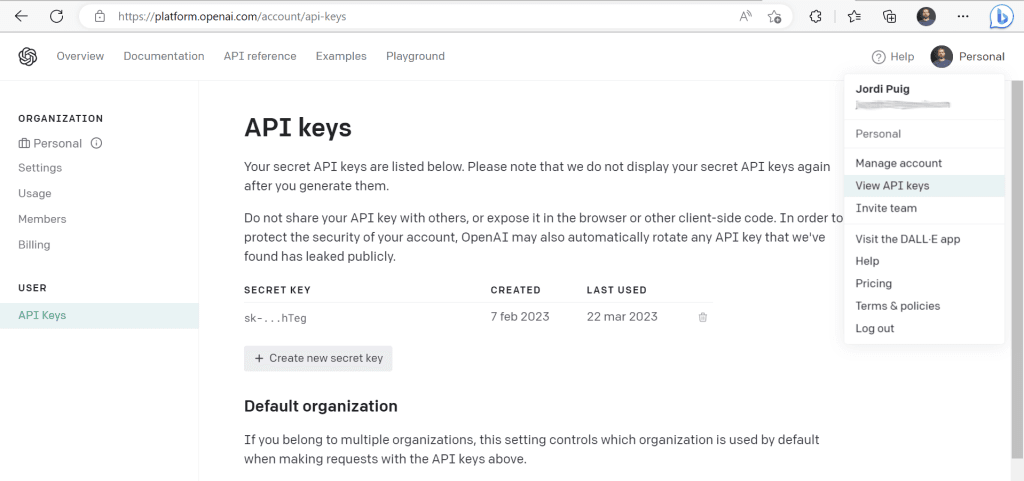
We will use this Token later in the flow that we are going to create. It is important to know that we should not share it, as it allows the use of the API with our account.
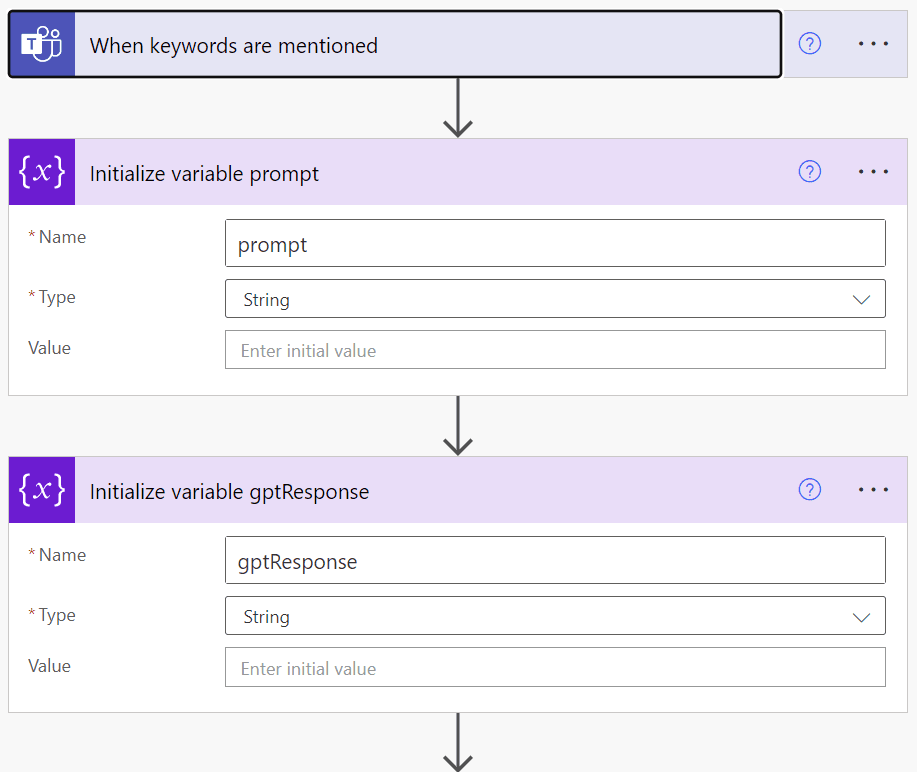
Step 2
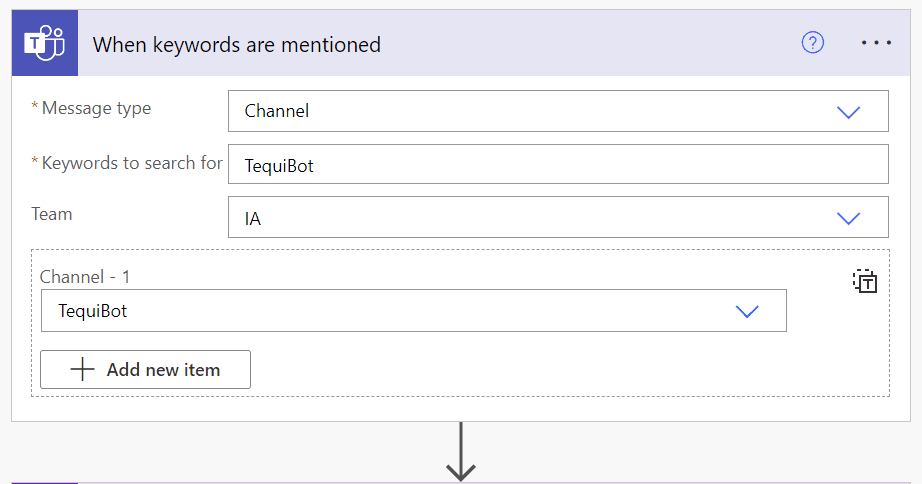
Log in to Power Automate, and create a flow with the “When keywords are mentioned” trigger from Microsoft Teams.
The next thing we need to do is choose the keyword that will activate the flow, in our case Tequibot, and indicate the Teams channel we want to use.
Step 3
Next, we initialize the prompt and gptResponse variables, which we will use later in the flow.
Step 4
Now we add a control of type “Apply to each” and insert the following value in the “Select an output from previous steps” field:
@{triggerOutputs()?['body/value']}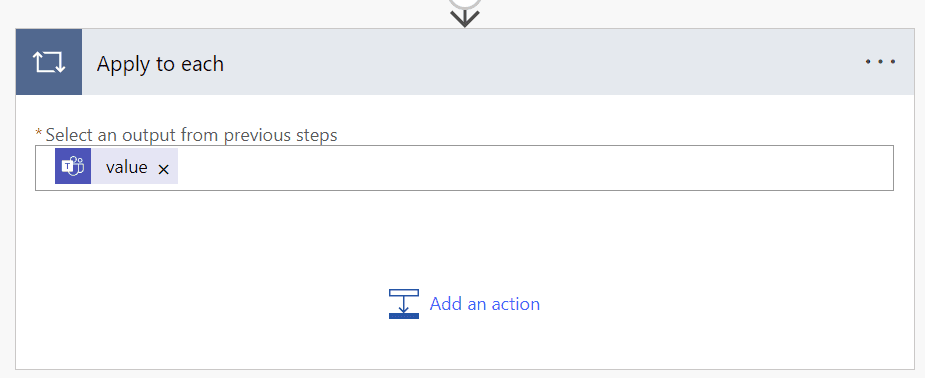
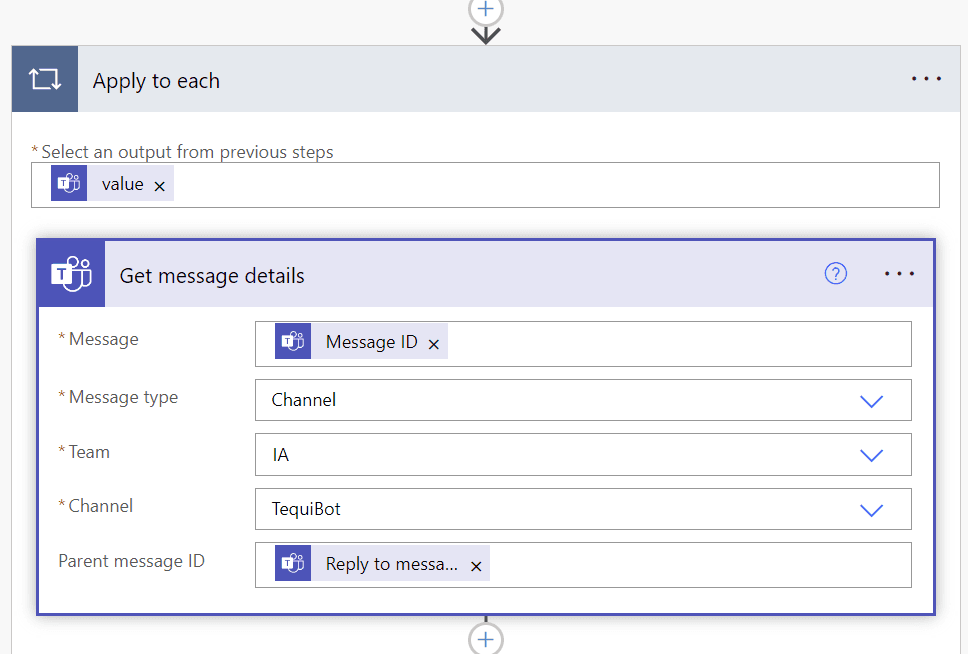
Step 5
Next, we add a new action of type “Get message details (Teams)” with the following values:
Step 6
Now we must save the content of the message that initiates the action in the prompt variable, with the following value:
@{outputs('Get_message_details')?['body/body/content']}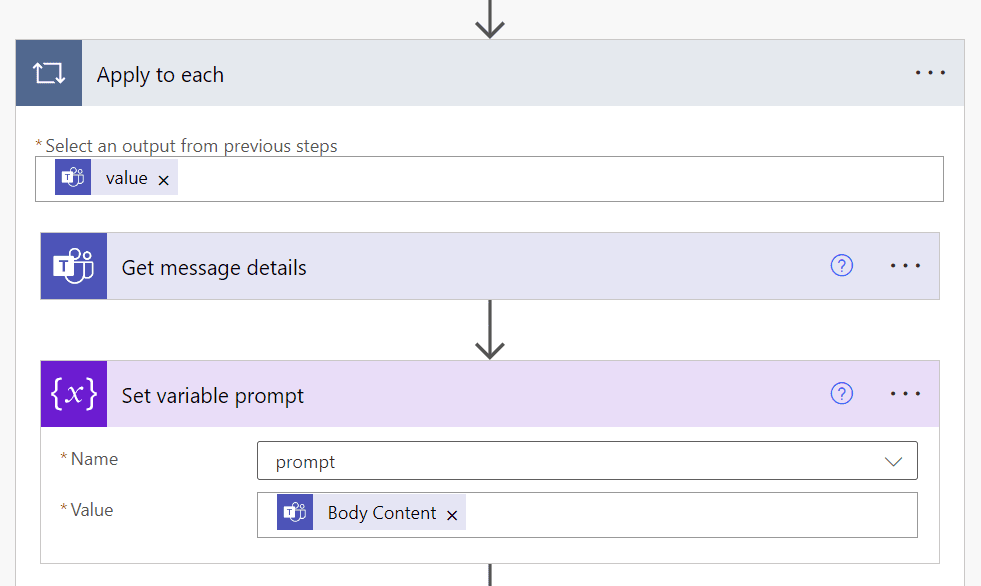
Step 7
The next step is to request the OpenAI API.
To do this, we use the HTTP component, which is of type “Premium” but can be used during the trial period, with the following values:

This is a POST request to the EndPoint
https://api.openai.com/v1/chat/completions, with the “Accept” and “Content-Type” headers indicated.
The value of the Token is the one generated in Step 1 with the prefix Bearer.
The model used in this case is gpt-4, although gpt-3.5-turbo can also be used by simply changing the value of the model variable.
The first message is of type “role system” and serves to give context to the Bot. But if we want, we can change this value to adjust the results obtained.
The second message is the one we have written in the Microsoft Teams channel and that we have previously saved in the prompt variable.
In addition, we can change the value of max_tokens to allow a larger response size.
It is important to know that low values of the temperature variable will make the responses less variable, but more reliable. Higher values can return more creative responses, but also more imprecise at times.
If needed, we can find more API details at the following link.
Step 8
At this point, we need to retrieve the value returned in the request and save it in the gptResult variable:
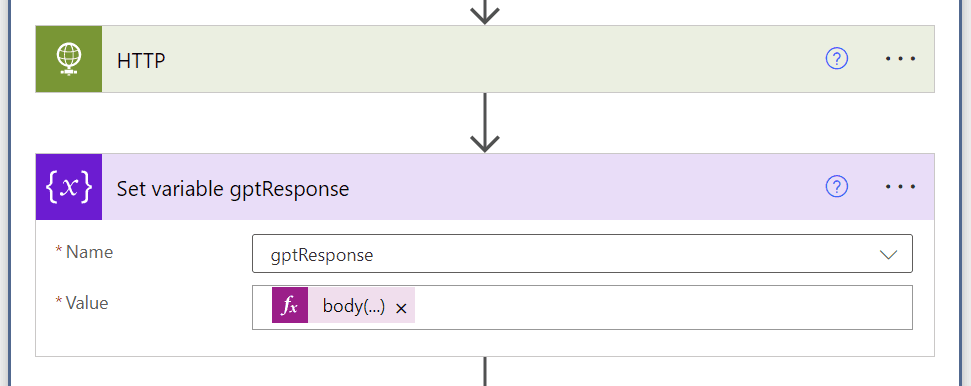
The value is obtained from the following expression:
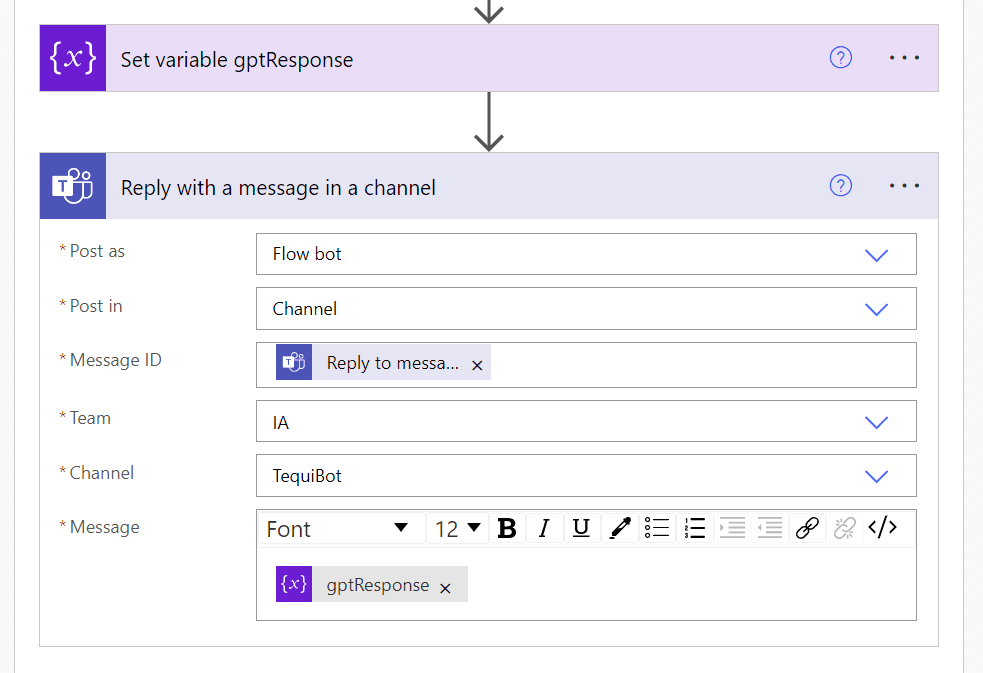
body('HTTP')?['choices'][0]?['message/content']Step 9
Now, we just need to add the action to respond to the message, based on the response obtained from ChatGPT.
To do this, we add an action of type “Reply with a message in a channel” from Microsoft Teams, with the following values, using the gptResponse variable:
Step 10
Now we just need to activate the flow and we can test it!
How can we make the Bot more interactive?
A very interesting improvement point is to offer the possibility of converting the response to the speech, using the Text to Speech service from Azure’s Cognitive Services.
To do this, we just need to:
- Create an API where we send the response text, and use the Language Detection service to detect the language used.
- Select one of the available voices and generate the audio file in mp3 format.
Additionally, in Microsoft Teams, we can use an adaptive card as a response that includes not only the text but also a button with the link to the generated audio.