How to manage your documents from SharePoint Online

In our article Automatic translation of SharePoint pages with Azure, we already discussed how to set up SharePoint to help us translate documents automatically. It goes without saying that SharePoint is a tool designed by Microsoft for document management and teamwork. It includes collaboration features, methods to automate processes and search, and a document management platform.
Using the delivery of permissions for the accesses, it allows:
- Store, organize and share information from any device.
- Access such information quickly and securely.
- Control the versions of the same document.
- Create Microsoft Office documents and save them directly to SharePoint.
- Protect sensitive content with document-level permissions.
- Access documents without internet connection.
Likewise, it has other functionalities for teamwork such as:
- Creation of spaces or websites to work in groups, collaborate and share content.
- Organization of work through calendars, tasks associated with users, etc.
- Extranet to share large files.
- Collaboration and online communication between teams.
- Status updates and personal insights with co-workers. Keep teams in sync.
- Keep up to date with the information and news of the institution.
- Real-time communication with colleagues.
In this article we will address the following points:
- What is a document library in SharePoint Online
- Step One: Create a Document Library
- How to manage the top menu in the Document Library
- How can I view a Document Library
- How to add columns with more information
- How to navigate within each level and sub level
- What actions can I perform on a folder or file
- How to activate Version Control for a Document Library
- How to manage who accesses what in a Document Library
- How to delete a SharePoint document library
- Why should I use SharePoint Online for my documents
What is a document library in SharePoint Online?
From the outset, it is important that you understand some concepts of SharePoint Online, such as its storage method. The base unit, the document libraries, are a safe place to host, create and update files, such as: Word, Excel, Pictures, etc. Plus, they can be shared with other team members, worked on together, and accessed from any device at any time.
It’s a lot like the Microsoft OneDrive service. The main difference is that OneDrive is intended for personal use, and SharePoint is intended for team file storage.
Document libraries are created within the SharePoint team site. By default, this site includes a document library, but you can create as many as you need.
Each document library features a list of files, folders, and important information (for example, who created or last modified a file).
In a document library, you can perform the following actions:
- Add, download, edit and delete a file.
- Control who has access to a particular library or file.
- Trace the activity of a file.
- Share files or folders.
- Create quick links to the library.
- Create managed metadata columns, which allows you to control what information users can enter in a column.
Step One: Create a Document Library
At the top left of the site content page is the options bar. When clicking on New and selecting Document Library, in the Create Document Library window we must write a name and add an optional description.


We have 3 differential elements:
- The menu bar at the top: the buttons change depending on the selected item (folders, files, etc).
- The path of the element: the title “Files” is not a title but a path, which will help us to navigate through the folder tree.
- List of elements: with customizable columns and different types of visualization.


- Element fringe
- Selection icon
- Icons Column
- File name
- Share (appears when clicking on the file)
- Menu (appears when clicking on the file)
- Default Columns (Modify; Modified by)
- Add column
How to manage the top menu in the Document Library
After creating a document library, you can add content, either creating it from scratch or uploading it from your computer. Also, it can be synced with the OneDrive service.
Under New, you can create anything from a folder to Office 365 documents to a link to a particular item outside of the document library.

From Upload you can post files or folders saved on your computer. Just tap on its namesake button at the top of the document library and select files or a folder.

The Quick Edit option displays the list of uploaded files in table format. To exit this view, tap Exit Quick Edit.

In addition, SharePoint offers us other options:
- Export to Excel: Exports the list of documents in an Excel file.
- Power Apps: Build apps using Power Studio.
- Automation: Generate automation flows using Power Automate.
- Alerts: Set alerts to be aware of changes to items.
- Manage Alerts – Manage all alerts created on the site.
- Filters: by clicking on the filters icon, we access different display filters.
- Sort: Sorts the list ascending or descending by column.
- Information: On the selected item, allows you to view activity on the file and also manage access permissions.
- All documents: this button opens a menu with the options shown in the image below.

How can I view a Document Library?
At the top of the page you can switch the document library view between list or tile view, you can even customize the view and display the columns you want.
- List: The default view in SharePoint Online.
- Compact List: A very similar format, but with less space between elements.
- Tiles: Published folders are displayed, arranged in a matrix.
Add columns with more information
You can add new columns to have more information at a glance, by clicking on + at the end of the Add column header.

You can access the Details Panel for a specific file, folder, or document library link to view properties, who has access, recent activity, and other supplemental information.
How to navigate within each level and sub level
With a single click on the name, we access the folder or open the file. If we click on another place in the strip other than: the name, the sharing icon or the ellipses, what we do is select the element. Several elements can be selected to perform joint actions on them (for example, download them to our local computer).

The element path is used to move backwards in the folder tree.

The information panel can also be viewed by clicking Details when a file or folder is selected.

What actions can I perform on a folder or file?
When a file or folder is selected, different actions can be performed on it.
If you are in the list view, you have to click on the ellipsis that appears next to the name or from the top menu.
Among others, this three options will appear:
- Delete: Files or folders that are deleted will remain in the Recycle Bin for 93 days by default.
- Pin to top: The selected folder or file will always appear highlighted at the top of the list. Very useful when we start working with long lists of documents.

- Rename: files or folders.
- Move To: Move files and folders within the library or to other SharePoint sites, including OneDrive.
If it’s a file, you’ll also have:
- Open: in the browser (Office Online Services) or in our local Office.
- Version history: every time we modify a file, a new version of it is saved if we have version control enabled.

Using the SharePoint Framework together with a model of web parts and pages, you can create custom actions for items in a list or document library.
Activate Version Control for a Document Library
Enabling version control on a document library allows you to track documents chronologically and retrieve older versions if necessary.
When you enable and configure it, you will be able to keep the different versions of a document every time a modification is made. In addition, you can give access to all versions to the entire organization or to certain users.
To do this, click Settings, and then go to Library Settings.

In Library Settings click on the Version Settings option
Once you enable versioning, you can access the version history of a selected document.

Manage who accesses what in a Document Library
In order to configure access permissions, you need to have the role of administrator or owner of a document library.
By default, all libraries in a site collection inherit the permission settings of the site directly above them in the site hierarchy. At the document library level, we can customize those permissions for each element, and these will be inherited in turn by everyone who “hangs” from it.
There are several ways to manage permissions:
- We can manage the permissions of a document library by going to Library Settings. Once there, we select the Permissions option for this document library.
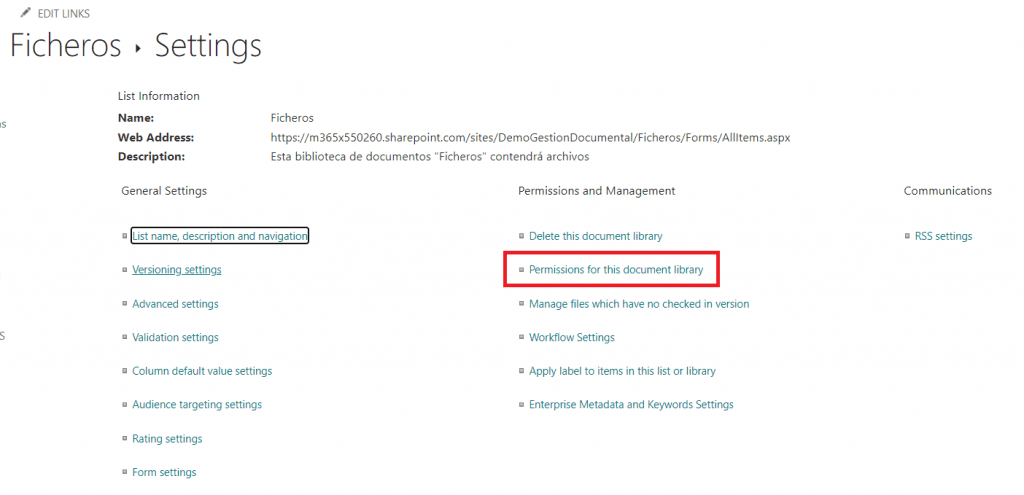

- You can also select an item and access permission management through its menu or the Information icon in the top menu.

- When done, a panel appears on the right side:

The Stop Sharing button only appears when the item has ever been shared and removes all access except for the owners.
At the top we see the links created with the Copy button. We also have a Share button. The 3 points open another panel where we can delete the link and configure who to share it with.
In the part entitled Direct access, the groups or people who already have access are listed. By clicking on the arrow we can change the type of access.
Delete a SharePoint document library
Deleting a library removes the documents’ metadata, version history, its settings, and any specific permission levels defined within it.
To delete a document library, go to the Library Settings. Once there, select the Permissions and administration option and click Delete this document library.

If you accidentally delete a library or change your mind, depending on how the site is set up, you can restore it from the Recycle Bin.
Deleted items are kept in the recycle bins for a set amount of time. In SharePoint, the retention time is 93 days. It starts when you remove the item from its original location. When you delete the item from the site’s recycle bin, it is included in the site collection’s recycle bin. It stays there for the rest of the 93 days, and then it’s permanently deleted.
You can restore a library, file, or version of a file to its original location, as long as you haven’t already deleted its parent. A file cannot be restored if the library it belonged to has been deleted. You must first restore the library, and then restore the file to the library.
Why should I use SharePoint Online for my documents?
Many years ago we began to lose the habit of keeping thousands and thousands of physical files with hundreds and hundreds of different printed documents. SharePoint Online is the evolution of that whole process, but much more comfortable. No need to print and set up a shelf or have to get too organized to keep track of changes in a single document.
In short, it is important to learn to use SharePoint Online, and to master all its features and tools because it is simply the next step towards digitizing your company (something that is increasingly necessary) and, at the same time, it is simply a “simulation” of something you’ve been doing all your working life.